Thursday, December 19, 2024

Chili Con Carne


Not to reopen an old wound and debate, I know the difference between "Chili" and "Chili con Carne".  Both are tasty, one has beans, the other doesn't.  In Texas if you call it chili and add beans be prepared to be shot at.  To them chili is a hearty beef and chili pepper stew.  Go to the NE states and they shoot you if you try to explain "real" chili doesn't have beans so you lose there too.  Hence I make the differentiated two kinds.

Chili Con Carne

  • 2 lbs diced beef (chuck steak works best)
  • 2 can 14.5 oz  black beans
  • 1 can 14.5 oz diced tomatoes
  • 1 bay leaf
  • 1 large onion diced
  • 3 cloves garlic (about 1 T) minced
  • 1 T Better than Bouillon beef flavor 
  • 2 T Chili powder (I use McCormicks)
  • 2 t chipotle chili powder (I use Spice Islands)
  • 1 12 oz can lager style beer
  • salt and pepper
Break up diced beef and sauté until well browned.  Add chili Powders and toss to coat.  Add onion and sauté until it is translucent.  Add garlic and cook one minute.

Add beer and tomato, stir.  Drain one can of black beans and add the other can undrained.  Stir in the beef Better than Bouillon.   Bring to boil and reduce to simmer. Cover.  Cook about 2 hours on a low simmer.
At this point you can serve or cool and put in fridge for reheating the next day.  Everyone knows chili is better the second day, and prepping a day in advance works to get maximum melding of flavors.

Garnish with oyster crackers, green onion, cheese (I like a cheddar jack blend) and sour cream.


Saturday, November 9, 2024

My Spin on Nigella's Pumpkin Bundt Cake


Nigella Lawson is one of my favorite TV cooks and her recipes are so easy and approachable. I have made several of hers over the years and many are in my weekly repertoire.  

The Pumpkin Bundt  Cake is a recent recipe that is also part of her "cook along" contests she runs monthly.  I entered, with my spin of course as I usually can't just make a recipe as published.  In this case I added 2 cups fresh cranberries to the batter before pouring into the pan.  The addition of cranberry makes a nice acidic pop and counterpoint to the sweet glaze.  It sure was a hit in my house with that little change.

I used freshly put up steamed pumpkin and drained as she suggested to remove excess water.


"Putting up Pumpkin"

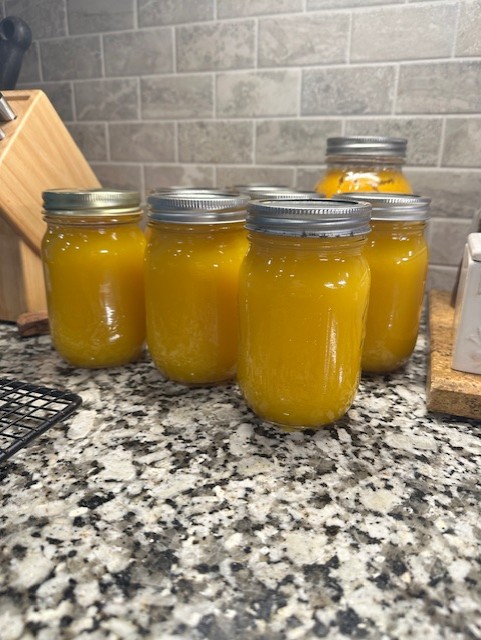
 Its no secret that I commit Jackocide every Halloween with our left over pumpkin.  I take the the jack-o-lantern from the big night and cut it into cubes to either roast or steam.  I tend to use the roasted pumpkin for making soups, the steamed for breads and cakes.  Note these are not "canned" in the traditional sense, but rather prepared and stored in the refrigerator where they are good about 6 months.


I typically start by taking the pumpkin and cutting it into strips that I then slice off the outer skin and cube the remaining pieces to about 1" squares.  The cubes can then be roasted or steamed.

Roasting method is stupid easy.  Line a sheet pan with foil to make clean up easier, spray it with non-stick spray and put the pumpkin on in a single layer.   Roast at 425F for 15-20 minutes until fork tender AND starting to darken on the corners.  Immediately transfer the pumpkin to a food processor and blitz until it is a fine puree.  Put into a sterile canning jar and microwave 2 minutes until steam starts to rise from jar.  Immediately put lid and screw on collar.  Set aside on counter until the lid "pops" and cooled to room temperature.  Put in refrigerator and store up to 6 months.  This is perfect for soups.


Steamed method is equally easy to do.  In a large stock pot add prepared pumpkin and fill to within 2" of top of pot.  Add 2 cups water.  Bring to boil then reduce to simmer.  Cover and let it steam cook until until the largest pieces at top of the pot are fork tender, about 20 minutes.  Remove steamed pumpkin  with a slotted spoon or spider and add to a food processor.  Process until puree is smooth. Put into a sterile canning jar and microwave 2 minutes until steam starts to rise from jar.  Immediately put lid and screw on collar.  Set aside on counter until the lid "pops" and cooled to room temperature.  Put in refrigerator and store up to 6 months.  This is perfect for cakes and breads.  


Again, these put up pumpkins are not canned in the traditional sense of a steam bath after bottling.  They are NOT meant to be stored at room temp in a pantry.  If you want to store in a pantry with a longer shelf life check google how to steam pumpkin for canning.  This method is to be refrigerated and used within 3-6 months.


Wednesday, October 30, 2024

Pumpkin Curry Soup

Simmer simmer and a glimmer of dinner.   This was a right tasty bowl of soup and so VERY STUPID EASY to complete.  The lovely Mrs and I ate every last drop and stopped short of licking our bowls clean.  Very satisfying and warms the soul.  The kid wasn't a fan, but he doesn't like soup in general so its his loss.

I use a "Madras Curry" but you can use your favorite.  Madras Curry powder is much warmer than regular curry powder so add a half teaspoon at a time to taste to keep from blowing your taste buds off your tongue.  Seriously, its worth the try just add to taste incrementally.

You can use canned pumpkin, but its so easy to carve up and roast one then puree ahead of time.  "Canned" properly home roasted pumpkin that you puree will keep 3 months in the fridge easy.  (recipe will follow in a future blog post.

This is so close to vegan that you can twist things up and use veggie broth and voila its vegan.  Something I reserve for Meatless Mondays around here, but today was Wednesday so I used chicken broth.

Pumpkin Curry Soup
Ingredients

  • 2 1/2 c  roasted pumpkin puree
  • 1 14 3/4 ounce can low sodium chicken broth
  • 1/2 white onion diced
  • 2 cloves of garlic minced
  • 1 - 2 1/2 t curry powder (to taste)
  • salt to taste
Garnish
  • fried jalapeno chips
  • sour cream
  • herbed croutons
Method

Place onions in a sauce pan with a scant T olive oil and sauté until translucent.  Add garlic and cook one minute until fragrant.  Pour half can of broth into a blender cup and add whiz up until no chunks remain.

Return onion puree to sauce pan, add pumpkin and remaining broth.  Bring to boil and reduce to simmer.  Add curry powder incrementally starting at 1 teaspoon  adding  1/2 teaspoon at a time tasting until you get the desired spiciness and heat.  Test for seasoning, add salt as needed.   Simmer 30 minutes until it is a consistency you like and flavors are developed.

Remove from heat and serve with garnishes.


Wednesday, October 2, 2024

Cherry Pistachio Cheesecake


A little slice of heaven.

This was a stumble across in an old recipe box.  I have vague memories of it as a kid in the 60s so we know its at least that old.  In looking at the recipe I saw it was ripe for updating.  Pistachios sprinkled across the top, but none in the crust?  Cherry's taste more cherry like with almond extract but none in the recipe?  No salt anywhere why?  

So I looked at everything and went about updating this recipe for the new century.  It was all to amp up flavor and texture.  It was a huge hit at the dinner party the other night.

Cherry Pistachio Cheesecake
Crust
  • 1 1/2 c graham cracker crumbs
  • 1 stick unsalted butter, melted
  • 1/4c finely ground pistachio
  • pinch of salt
Filling
  • 16 oz cream cheese
  • 1 c sugar
  • 1/2 t vanilla
  • 1/2 t almond extract
  • 1/8 t salt
  • 3 eggs
  • 1 cup sour cream
  • 1 1/2 c cherry pie
  • 1/2 coarse chopped pistachio

Preheat oven to 325F.  Line 9 X 13" baking pan with parchment paper.

Combine graham cracker crumbs with ground pistachio and a pinch of salt.  Toss lightly to blend the mixture slightly.  Add melted butter and toss until the crumb mixture is evenly wet.  Gently press mixture into the prepared pan.

In mixing bowl add cream cheese, sugar, salt, vanilla and almond extract.  Beat at medium speed until fluffy and well mixed. (about 5 minutes).  Add eggs one at a time and beat in until well mixed.  Scrape down the sides as needed while beating mixture.  Reduce speed and add sour cream and mix until just blended.   Pour over the prepared crumb base.

Add cherry pie filling by spoonful over the filling keeping them 1-2" apart.  With table knife swirl cherry pie filling around the filling until nicely marbleized.  Sprinkle chopped pistachio evenly over filling.

Place baking pan on a sheet tray and pop into the preheated oven.  Bake 50-60 minutes until the filling is just starting to brown.  Test center with toothpick to make sure its set.  The mixture will be jiggly and will set as it cools.

Cool on counter to room temperature then refrigerate at least 2 hours before serving.   

TIP: Make sure all filling ingredients are at room temperature.  If they aren't its a booger to get it all blended evenly.  I usually set all the ingredients out overnight to ensure they are equal temperature.


Saturday, August 3, 2024

Spiced Mussels


 Stupid easy Spiced Mussels is a better title.  Minimal easy prep and if you can boil water you got it made.  The lovely Mrs says this is the best mussels in broth I've made yet and requested we do it again soon.

The inspiration for this recipe came from an old Gordon Ramsay show.  Being in SE Texas I didn't have access to the variety of chili's he used but found a red jalapeno pepper to be the right substitution for the fresno chili.  The jalapeno when red is sweeter and not as hot as the green ones that hadn't fully ripened.

Ditto my elation in finding fresh frozen mussel's at the local grocery store.  Already shucked and only need a few minutes of simmering to cook through.  Serve with a crusty baguette to sop up the broth and you are eating well.  You can use fresh mussels if get them, just cook until all have opened (and discard those that don't open).

Another substitution you can use is if you can't find creme fraiche you can use equal amounts of sour cream.

Spiced Mussels

Ingredients:

  • 1lb fresh frozen mussles
  • 1 shallot thinly sliced
  • 1 rib celery thinly sliced on bias
  • 1 red jalapeno thinly sliced
  • 1 stick unsalted butter
  • salt and pepper to taste
  • 1 c dry white wine (I use pinot grigio)
  • 2 T crème fraiche
  • sliced crusty baguette
In medium fry pan add shallot, red jalapeno, celery and butter.  Over medium heat sauté 3-5 minutes until veggies are starting to become translucent.

Add white wine to pan and bring to boil, reduce to simmer.  Simmer 5 minutes to cook out the wine.

Add mussels.  Bring to boil and reduce to simmer 5-6 minutes until cooked through.  Stirring occasionally.

Turn off heat and add crème fraiche and stir until dissolved into broth.  Very important to do this off the heat as you can curdle your crème fraiche if too hot.  Serve immediately in a bowl with the baguette on the side. 

Lemon Gooey Butter Cake


Some days I just have to say...DAMN I'M GOOD and be done with it.  By now you know I love the Gooey Butter Cake, but this guy just can't do vanilla.  This is an amazing slice of happiness.  Hit you in the face with lemon flavor but not so lemony as to be acidic.  

Swapping out cake mixes for the bottom layer is easy enough.  For the top layer, the gooey part it took a little of careful thought.  I increased the powdered sugar part of this layer to counteract the extra bit of liquid in the form of lemon juice to amp up the flavor in this layer.  Also adding to the flavor bomb is the generous use of lemon zest.

Lemon Gooey Butter Cake

Ingredients:
  • 1 box lemon cake mix
  • 1 stick butter, melted
  • 3 eggs
  • 1 8 oz package full fat cream cheese
  • 4 1/2 c powdered sugar
  • pinch of salt
  • 1/2 t vanilla
  • zest of one large lemon
  • juice of 1/2 large lemon (About 1 tablespoon)

Preheat oven to 350F

In mixer with paddle attachment add the cake mix.  Beat 1 egg.  With mixer on low slowly add egg and melted butter.  Increase speed to medium and beat on medium until egg and butter incorporated into a sticky dough, about 2 minutes.

Grease a 9X13 baking pan with cooking spray.  scoop dough into the prepared pan and press with fingers until level and entire bottom is covered.  Helpful hint...spritz your fingers with cooking spray and the dough won't stick to your hands.

In mixer swap paddle for whisk attachment.  Add powdered sugar to mixing bowl.  Cut room temperature cream cheese into cubes and add to powdered sugar.  Add 2 beaten eggs, vanilla, lemon zest and juice, with the pinch of salt to the bowl.  Start mixer on low and increase speed as mixture becomes a loose batter like consistency.  Increase speed to medium and beat 2-3 minutes until all cream cheese is incorporated.  Pour this layer over the cake mix bottom layer.  Smooth with spatula to get it into the corners.

Bake 40-50 minutes until top is a good brown color and there is a visible thin layer of crispy crust on top.  Cool to room temperature before cutting and serving.  Note the cake will fall a little while cooling.  Serve with a dollop of ice cream or whipped cream.
Cake base in prepared baking pan.  Note there is a baking sheet under the pan to catch any spills that happen as the cake rises during the baking process.

Top layer on the cake mix base
Cake baked to a perfect brown with crispy crust over the gooey layer.


Thursday, July 11, 2024

Baja style Grilled Lobster


What makes this Baja style.  A few things, mainly its a close copy of the grilled Lobster I had in Puerto Nuevo, Mexico years ago.  Its smoked pimenton (paprika) and ancho chili powder in a garlic butter basted with a squirt of lime juice before you flip them over.  Say what...yes you briefly flip them over just to get a little grill line and finish them off before serving.

What's the aluminum foil log on the side?  Thats another element of making it Baja style.  My first exposure it was grilled over a bed of mesquite coals.  To add that element to your gas grill take a sheet of foil, layer about a cup or so of mesquite chips, fold it up into a tight package and then puncture a few holes in it to let the smoke out.   Place the packet over a burner kept on high to get it smoking.  Et voila...mesquite smoke on a gas grill.

I'd be remiss in letting you think I broke the bank for 6 lobster tails to celebrate my daughter and her families visit for the 4th (and Hurricane Beryl).   I have a source for wholesale priced seafood that can't be beat.  It's Here Ya Geaux Live Crawfish and Seafood here in League City TX.  They serve the bordering communities and will be expanding as they grow their clientele.  Crawfish may be a specialty but they have other excellent seafood choices that are uber affordable.   If you're in my area definitely check them out.

Baja Style Grilled Lobster

  • 1 stick unsalted butter
  • 1/2 tsp salt
  • 1/2 tsp Smoked pimenton 
  • 1/2 tsp ancho chili
  • 2 cloves minced garlic
  • Juice of one lime
  • 6, 10-12 oz Lobster tails
Preheat grill on high.  Add foil packet of mesquite chips.

Place lobster on cutting board and make a lengthwise split through the hard back shell down through to the membrane underneath.  Fold the lobsters in half lengthwise to expose the meat inside.  Hint if you don't have a knife sharp enough to split the back, use kitchen shears to but the back then the knife to cut through the flesh.  Place prepared lobsters on a tray.
Melt butter and stir in garlic, salt, pimenton and ancho chili powder.  Baste the lobster tails with butter mixture.
Reduce heat for all burners except the mesquite packet to low.  Place tails shell side down and cook 4-6 minutes with the lid closed.  Just as the tails are bright coral and the top is nearly raw still baste with remaining butter and squirt lime juice on the tails.  Turn over and grill lightly 2-3 minutes until finished cooking through.

Remove from heat and serve with any Mexican style rice you like and a veggie.  To remove meat grasp the tail and insert a fork in the meat next to the tail.  With a little effort lift the tail meat out of the shell and enjoy!

Wednesday, July 3, 2024

Peanut Butter Buster Bars


Man oh man has it been a busy few months.  And nothing changes other than my daughter Kari and her family are coming for a visit.  That means a little extra baking making treats they all adore.  For Kari it's an old family treat we've been making since the 80's - Peanut Butter Buster Bars.  As the name implies its got a whole jar of peanut butter in it and is topped with  chocolate layer on top.

Here's a handy tips for you.  USE YOUR MICROWAVE.  Yes, it does more than just reheat leftovers and pop Popcorn.  In this instance it makes perfectly tempered chocolate topping and makes for a pourable peanut butter when needed.  I live by my MO for lots of cooking tasks. 

Peanut butter matters.  Use a commercially available creamy peanut butter.  Don't use those natural varieties as the oil separates and will ruin your batch.  I use JIF, but any major brand or store label will work.

There are probably dozens of variations on this recipe, and probably as many names.  Our family version came from our neighbor in Las Vegas, Delores Smith.  It is among the stupid easy treats you can whip up in a flash.

Peanut Butter Buster Bars

Ingredients:

  • 6 cups Special K Original
  • 1 C corn syrup
  • 1 C sugar
  • pinch of salt
  • 1, 16 oz jar Creamy Peanut Butter
  • 1 1/2 C Semisweet chocolate chips
  • 1 1/2 C Butterscotch chips
Prepare a 9X13 pan by spraying with cooking oil.  Set pan aside.
Combine corn syrup, sugar and salt into a very large pan (nonstick if you have one).  Over medium heat whisk together the ingredients and let it heat undisturbed. As soon as small bubbles form around the edge watch it closely and allow to just come to a boil.  As it comes to boil turn off the heat. 
Microwave the peanut butter in the jar 1 minute.  Pour the now molten peanut butter into the hot syrup mixture and whisk until smooth.  With a heatproof silicon spatula fold in the Special K Cereal until it is all coated with peanut butter syrup mixture.
Pour hot cereal mixture into prepared pan.  Smooth out to corners and level with your spatula.
In a microwave safe bowl add the chocolate and butterscotch chips.  Microwave 30 seconds.  Stir with a clean spatula, some chips will have started melting already.  Microwave 30 seconds more and give it another stir, don't be alarmed if the resulting mixture feels too stiff its normal.  Microwave in 10 second intervals stirring between each interval.  For my machine it took a total of 3, 10 second intervals before it was warm enough to stir to completely melt all the chips and make a smooth "frosting".  Pour the "frosting" over the cereal mixture and smooth with the spatula.  Cool several hours to let the frosting set then cut into bars for serving.  

Sunday, February 18, 2024

Mussels in Beer & Cream


My family and I love mussels.  Problem I run into here is that the Gulf doesn't produce them in the quantity and frequency that I was accustomed to in the SoCal.  Fortunately the local H*E?*B stocks fresh frozen 1 pound bags of this delectable treat so we can enjoy them year round.

I've got a really good Seafood Stew recipe I know by heart and toss in mussels instead of clams from time to time. All is good but every now and them I just want a mussel dish that celebrates just them.  I've searched around and adapted a couple to suit my family.  They like it and I hope you do too.

Ingredients
  • 1 lb frozen mussel meat - thawed
  • 2 T butter
  • 2 T olive oil
  • 1/2 minced red onion
  • 2 T minced garlic
  • 1 12 oz can of beer (light lager is fine, no IPA)
  • 1 14.5 can diced tomatoes
  • 1/2 C half and half
  • 1/2 c chopped Italian flat leaf parsley
  • 1/4 c chopped cilantro
Method:
Heat olive oil and butter over medium heat.  Add minced onion and cook 3-4 minutes until translucent.  Add garlic and cook 1 minute longer.

Pour in beer and can tomatoes with liquid.  Bring to boil and simmer 7-9 minutes until reduced slightly.

Add thawed mussels and half & half.  Simmer 2-3 minutes until mussels are warmed through and sauce is slightly thickened.  Stir in parsley and cilantro.

Serve with sauce in a large bowl, crusty bread for sopping up the sauce and a nice chilled unoaked chardonnay like Pear Valley Chardonnay.


Friday, February 16, 2024

Double Chocolate Toffee Oatmeal Cookies


Not everyone is a fan of cookies, twisted I know, but I've got one such person in my household.  When she declares, "keep this recipe", I listen.  Perfect for those days you're jonesing for chocolate.

Ingredients

  • 3/4 C butter - room temperature
  • 3/4 C sugar (white or turbinado)
  • 1 C packed brown sugar
  • 1 1/2 t vanilla
  • 3 large eggs
  • 2 1/4 c flour
  • 1 1/4 c rolled oats
  • 1/2 t salt
  • 1 1/2 t baking soda
  • 3 T Hershey's Special Dark Cocoa powder
  • 1 1/2 C semisweet chocolate chips
  • 1 8oz bag toffee chips
Method
Preheat oven to 350F.
In mixer add sugars, salt, and butter.  Cream well.  Add eggs one at a time and beat well between additions.
Sift together dry ingredients.  With mixer on low add them spoonful at a time and mix only until just blended.  
Fold in oatmeal.  Fold in chocolate chips and toffee chips.
On a parchment lined baking sheet drop by spoonful* onto  baking sheet.  Bake 9-10 minutes for small cookies, 15-16 for large cookies.  Cool on wire rack.

*I use a large #25, 1 3/4 ounce ice cream scoop as we like a large cookie.  If using a smaller 1 ounce scoop use the shorter baking time.


Sunday, February 4, 2024

Ham and Cheese Tart


 Ooey gooey with melted swiss and black forest ham wrapped in a flakey crust of puff pasty...perfect addition to a cheese board for wine and cheese night.

I do have one ingredient that is hard to find.  Sel Gris Aux Herbes.  Gray sea salt with herbs.  This coarse herbed sea salt adds a nice savory salty crunch to your flakey pastry that is hard to duplicate with any replacement.  Try ordering online M. Gilles Sel Gris Aux Herbes.  Its a great finishing salt on steaks, fish and poultry too, you'll thank me later if you do buy it.  

Ingredients

  • 1 box (2 sheets) Pepperidge Farms Puff Pastry sheets, thawed
  • 8 0z black forest ham - deli sliced
  • 1 T Dijon mustard
  • 5 slices swiss cheese
  • 1 egg
  • 1 T sesame seeds
  • 1 t Sel Gris Aux Herbes
Assembly
Preheat oven to 425F

Line baking sheet with parchment paper.

Carefully unfold 1 sheet of pastry onto the lined baking sheet.  Using a pastry brush lightly spread the Dijon mustard on the pastry sheet leaving a 1/2 inch margin on the edges.  Layer the ham on the mustard maintaining the 1/2" margin.  Place the cheese on top of the ham using the one piece to trim to fit any gaps you have on top of the ham.  

In a small bowl add the egg and a tablespoon of water and beat to make an egg wash.  Using a new pastry brush, brush on a thin layer of the egg wash along the edges in the 1/2" margin. Place the remaining sheet of pastry on top of the layered ham and cheese.  Crimp edges with a fork.

Brush the entire top of the pastry with the egg wash.  Sprinkle on the sesame seeds and Sel Gris Aux Herbes.

Place in preheated oven and bake 20-25 minutes until rich golden brown.  Cool 5 minutes then cut into 9 squares.  (A long bladed serrated bread knife works best).  Place on cheese board and serve.

Monday, January 15, 2024

Langoustine Pot Pies


 I love me the little Langoustine.  Lobsters smaller cousin and just as tasty.  I get the two pound bags of them at Costco which are available seasonally at a fraction of the cost of lobster.

This recipe is an adaptation of several "seafood pot pie" recipes.  The filling is super flavorful thanks to the deglazing with dry sherry that is allowed to cook down.  Sherry is a white wine fortified with brandy and adds a terrific layer of flavor to your basic cookery.  Whatever you do don't get cooking sherry as it can be a salt bomb, like all cooking with wine use one you would drink.

Langoustine Pot Pie

Ingredients

  • 3 T Butter
  • 1 small sweet onion or shallot - fine dice
  • 3 cloves garlic, minced
  • 1/4 c dry sherry
  • 2 T flour
  • 1 3/4 C heavy cream - room temperature
  • 1 lb. langoustines, fresh or frozen
  • 1/2C frozen peas
  • 1/8 t fresh grated nutmeg
  • Kosher salt and pepper to taste
  • 1 14 oz package frozen puff pastry
  • 1 egg beaten
Method
Preheat oven to 425*F

In a large sauce pan melt butter.  Add onion and garlic.  Cook over medium heat until just translucent.  Add Sherry and cook down until it resembles a thick syrup.  Add flour and cook 1 minute until completely dissolved and cooked through.

Add heavy cream 1/2 c at at time and whisk in to ensure no lumps.  Bring to low boil.  Add langoustines and return to low boil.  Add peas.  Test for seasoning and add salt and pepper as needed.  Add nutmeg.

Brush rims of 4, 8 ounce ramekins.  Divide hot langoustine mixture between the ramekins.  On a lightly floured board roll out the puff pastry sheet until approximately a 12 inch square.  Make 4 circles of pastry 1 inch wider than ramekin. Place pastry on top of ramekin and lightly press along outer rim of the ramekin.  Brush tops with egg wash.

Place the pot pies on a baking sheet and bake in preheated oven for 25-30 minutes until puffed and bubbly and pastry is a rich golden brown.
 
Let cool 5-10 minutes before serving.
Pot Pie...the money shot, breaking the crust

A few tips.  Make your life easier with the minced garlic.  Use a micro plane to finely mince the garlic.  Much easier and cleaner than you get with the old chefs knife.  There will be some boil over so line your baking sheet with foil...makes clean up a breeze.