Sunday, October 13, 2013

Carrot Cake the teaser

I told you a few months back I'd find my old friend  Dee Dallaire from Phoenix carrot cake recipe.Dee was the manager of Diamond's Park Central Housewares department back when I lived there in the mid-ish 80s.  I was working retail and knew that the housewares managers always had the best food and recipes and listened to what they had to share.  I did find it and its as marvelous as I remembered, moist, hint of spice and nary a freaking raisin to be found in the thing.  Nor coconut.  This recipe does have pineapple which just adds to the moistness and adds just the right tang to make it better than average.  I mean, what good is a blog if you don't share what's better than average.

Its been a long day chasing my grandson. Yes, I found time to bake a cake from scratch and enjoy a slice with dinner.  I'm beat.  Tomorrow the full recipe will be up.

Saturday, October 12, 2013

Grilled salmon for a rainy day.

I'm a fan of the grill pan.  It gives those lovely marks just like a barbecue grill.  It just doesn't pack the smokey flavor of the outdoor barbecue. Smoked Paprika solves that and adds a delicate heat to it all as well.  I've post iterations of this in the past so this post will be about the pan.

Its a Calphalon Non-Stick grill pan.  Non-stick because its a compromise with the lovely Missus as its our deal.  I cook, she cleans up after me and she hates scrubbing.  Calphalon because that heavy gauge aluminum heats fast and evenly.  Also their non-stick was the best there was around when I bought this pan some 8 years ago, and the finish is still good.  Yes I take care to use only nylon tools so as not to scratch and ruin the surface, but that is the extent of the care it needs.

There are devotees out there for the cast iron grill pan.  To you I blow a big fat raspberry.  It takes longer to heat up, has hot spots and is a royal pain to clean. Then keep seasoned.  That last one my friends is reason numero uno why I don't have cast iron. Who wants to monkey around with special cleaning, drying then having to re-season when you are done.  Not.  Me.

All that aside smoke paprika is really a way to impart nice sweet hot smokey flavor to a dish or piece of meat.  Sprinkle it on, let it sit as a dry rub marinade for 15-30 minutes and you are set.  That period I put plastic wrap over it and simply allow the fish or meat to come to room temp. Added bonus is that room temp meat cooks more thoroughly and evenly than cold fresh from fridge.

Finding smoked Paprika isn't that difficult anymore.  Finding Good smoked paprika can be a challenge.  Gourmet shops have it, but they charge a small appendage.  Grocery stores stock OK but still pricey.  I found the current bottle I'm using at Cost Plus World Markets for under $4.  I've had similar luck at Surfas in Culver City and they have a veritable library of smoked paprikas covering a variety of price points.  I think I need to make another Surfas run soon.

Grill Pan Salmon

  • 4 8 oz salmon fillets
  • garlic salt
  • pepper
  • Smoked Paprika
  • Olive oil cooking spray


Clean and dry off your salmon fillets.  Give a quick spritz with cooking spray and sprinkle garlic salt and pepper to taste.  Dust each salmon piece with about 1/2 t smoked paprika.  Turn fillets over and repeat with spritz, garlic salt, pepper and smoked paprika.  Cover loosely with plastic wrap and let come to room temperature and marinade for 15-30 minutes.  (The spritz of olive oil allows the paprika to stick to the fish).

Heat grill pan over medium-high heat 3-5 minutes.  NOTE if you are not using a non-stick pan you will need to oil your grill pan.  Add salmon fillets and cook 3-5 minutes, or until the cooked line is about 1/2 way up the side of the fish.  Turn over and cook another 2-4 minutes until cooked through. Serve hot.

Wednesday, October 9, 2013

Faux Rice-a-roni

My kids are major fans of the Rice-a-roni. You know that marvy rice and pasta concoction from the 1960's that makes its ways to many a table every night? Its actually a pretty decent fast side for a lot of grilled meats, something I do a lot of around here. The only gripe I have is that its overloaded with salt and there isn't much you can do to about it.  Except make your own.

Its a pretty simple blend of herbs and dried chicken stock that you toss in with the pasta and rice after they are browned. An easy process to duplicate.  And I did.

Of course I figured as long as I'm gonna do it up faux I'll also make in the microwave to take one pot off the stove that I have to worry about.  This actually works out quite well in the microwave and is stupid easy once you program your M.O. to remember the settings.  Its clearly a set and forget.

I used the Better than Bouillon brand chicken base for my recipe as I was out of chicken broth.  You can simply use 2 cups chicken broth if you have it on hand.  I do keep this bouillon around as it has better flavor than the cubed stuff and WAY less sodium.  A big plus especially if you are on a low sodium diet for health reasons.  Its also a good way to add flavor to dishes where you don't want to add a lot of liquid and still get a big flavor boost with that slow cooked all day flavor.


Faux Rice-a-roni

  • 1/2 c fideo noodles
  • 1/2 c raw white rice
  • 2 T butter
  • 2 c water
  • 2 t Better than Bouillon chicken broth
  • 1/2 t garlic salt
  • 1 T dried parsley


In microwave safe covered dish add pasta and rice.  Top with butter.  Microwave for 1 minute.  Stir to coat rice and pasta with butter.  Microwave on high 1 minute longer.  Toss and repeat until pasta is a deep golden brown.  It takes about 3 minutes total in my 1250 watt MO.

Dissolve Better than Bouillon in water.  Add garlic salt and parsley to rice and toss.  Add broth and stir. 

Cover the dish.  Microwave 5 minutes on high power. Continue covered and microwave 20 minutes on 50% power.  Let stand 5 minutes.  Fluff with fork and serve.


Saturday, October 5, 2013

Gingered Pear Upside Down Cake with Salted Brown Sugar Caramel

This is a labor intensive cake, but then again most baking is.  Accurate measurements count a lot in baking, which I can do.  Paying attention to the steps, each one, one at a time helps too.

As its fall and we had a fun little evening soiree to attend I thought what the heck...lets be decadent and indulge. First thought was chocolate, then over to fresh fruit.  Seasonal fruit is Pears and Apples this time of year and I remembered this simply divine upside down pear cake many years ago I had made.  Then after digging around for ever I realized I lost it.  This recipe is a compilation of memory and a few others in my bag of tricks.

I use molasses and brown sugar as it simply has the best flavor, there is an almost smokey depth to the molasses that can't be duplicated with processed white sugar.  Molasses comes sulphured and unsulphured, I don't notice much of a difference in flavor or color between the two so use what you find.  Working with molasses the hardest part is measuring that thick sticky liquid then getting it all into your mix.  I've found that warming the molasses in the microwave for a minute will make it flow easier.  Spraying your measuring cup with cooking spray before measuring ensures a quick release and it all going into your recipe.

Gingered Pear Upside Down Cake
FOR TOPPING

  • 2 -3 firm pears 
  • 1/4 cup (1/2 stick) unsalted butter
  • 3/4 cup light brown sugar
  • 1/4 sea salt

FOR CAKE

  • 2 1/2 cups all-purpose flour
  • 1 1/2 teaspoon baking soda
  • 1 teaspoon ground cinnamon
  • 1 teaspoon ground ginger
  • 1/2 teaspoon ground all spice
  • 1/4 t fresh ground nutmeg
  • 1/2 teaspoon salt
  • 1 cup molasses 
  • 1 cup boiling water
  • 1/2 cup 1 stick unsalted butter, softened
  • 1/2 cup brown sugar
  • 1 large egg, lightly beaten
  • 1 t vanilla
  • 3 T minced candied ginger


Preheat oven to 350F.

Peel and cut pears into eighths lengthwise.  Spray the inside of a large oven proof skillet, non-stick if you have it with nonstick cooking spray.  Arrange pears in a decorative pattern in the skillet.  

Place 1/4 cup butter, sea salt and 3/4 c brown sugar in a small sauce pan.  Over low heat melt butter and stir until bubbly and sugar is dissolved.  Carefully drizzle the syrup over the pears.  Turn on heat to low and slowly bring the syrup to a boil, 2-3 minutes is all it takes.  Turn off heat.

Bring 1 c water to a boil and pour into molasses.  Stir until dissolved.  Set aside.

Sift together flour, soda, spices and salt.  Set aside.

Cream together stick of butter and 1/2 c brown sugar and beat until fluffy, about 2 minutes.  Beat in egg and vanilla.  Add 1/3 flour and 1/3 molasses, stir in.  Repeat until all flour and molasses has been incorporated. Fold in candied ginger. Carefully spoon batter over the pears so as not to disturb them.  Place in oven and bake 40-50 minutes until toothpick comes out clean from center.  Remove from oven and let cool 5 minutes.  Rim a knife around the outside edge and flip the cake over onto the serving platter.  (It works best if you place the platter upside down onto the pan and invert).  Serve warm or room temperature.

Pears arranged in skillet with caramel topping simmering.
Cake inverted on serving tray...note my pears did slip out of the pattern, but it was all still tasty.

Salted Brown Sugar Caramel
  • 1 c packed brown sugar
  • 1/2 c half and half
  • 4T unsalted butter (1/2 stick)
  • 1/2 t sea salt
  • 1 t vanilla


Combine brown sugar, half and half, butter and salt in a non-reactive pan.  Over low heat stir gently until the sugar is dissolved.  Increase heat to medium, stirring constantly and gently until mixture comes to a boil.  Cook for 7 minutes until thickened and a rich dark brown, stirring gently the whole time.  Add vanilla and stir until dissolved.  Remove from heat and pour into a clean jar until needed.


To serve the Gingered Pear Upside Down Cake cut off a slice and put on a serving plate.  Drizzle over a tablespoon or two of the Salted Brown Sugar Caramel over the cake allowing to run down the sides.  Add a dollop of sweetened whipped cream and you are set for quite the decadent fall treat.

Friday, October 4, 2013

French Onion Soup #FOOLPROOF

OK.  This is really stupid easy.  Time consuming, but easy.  If you can melt butter and stir you are done.  Allow ample time, 60-75 minutes for the caramelizing process.  Total time from start to finish comes close to two hours start to finish.

The key to this is really watching the caramelizing of the onions and  near constant stirring towards the end so you don't fry the onions or scorch them.  On the latter a heavy, non-stick interior pan makes it a little more fool proof.

I do take a few short cuts, and they are potentially laden with salt.  First is buy cooking sherry that doesn't come with salt added, it can be found.  Most of what you find in the groc is very high in sodium so do be careful with this step.  Beef or vegetable stocks can be high in sodium too, read the labels and get low sodium as well.  Also, with vegetable stock be careful as many add MSG or mono-sodium glutamate to boost their flavor, its not a good thing as many are allergic to it OR it can cause migraines which it does for me.

Meatless Monday...you this recipe counts if you use the vegetable stock.  Look for a vegetable stock that includes mushrooms for a richer flavor...or make your own.  I think I'll have to dust off my mushroom veggie stock recipe and post here as its really "meaty" in flavor without the meat produces used in its making.

Slice the onions thin. The thinner the better as it speeds up the caramelizing process.  Don't have that handy dandy hand held mandolin yet?  This recipe is the one to go out and find one as there are a LOT of onions to thinly slice.

Butter is used primarily as it browns better than oils do.  Worried about the saturated fat?  Then use a good olive oil.  The second reason butter is used comes to flavor, again olive oil will add flavor as well, not the same but as tasty. Vegetable oils are too neutral and just don't add in the flavor you are looking for.

This may sound like a lot of soup, but the onions do cook down a lot.  It makes 6 appetizer sized servings or doubled up for 3 entree servings.

French Onion Soup

  • 3 lbs Onions- thin sliced
  • 2 shallots- thin sliced
  • 2 cloves garlic-minced
  • 4 T butter
  • 1/2 t salt
  • 1 t ground black pepper
  • 2 bay leaves
  • 1/3 c sherry
  • 1 T Red wine vinegar
  • 32 oz (4 C) low sodium beef broth
  • 4 sprigs fresh thyme
  • 5 sprigs flat leaf parsley
  • Swiss cheese slices (presliced packaged works fine)
  • sliced baguette


In large heavy bottom pot melt butter over medium heat. Add onion, shallots, garlic, bay leaf, salt and pepper.  Stir occasionally at first, more often at the end until they are a deep golden brown. Towards the end you may need to reduce the heat to low to prevent burning or scorching. Color is flavor and this step can't be hurried.  Allow 60-75 minutes for this step.  

When your onions are a deep golden brown add sherry and vinegar.  Stir until nearly all is evaporated, about 3-5 minutes.

Tie together thyme and parsley with kitchen string.  Add beef broth.  Simmer uncovered 20-25 minutes until it has reduced by a cup to cup-and-a-half.   Test for seasoning, add more salt if needed. During the simmer stage preheat oven to 450F.  Slice and toast baguette.  Slice cheese.

At end of simmer remove bay leaf and the herb bundle.  Discard.  Ladle soup into serving dishes.  Top with baguette slice(s) and 2 pieces of cheese.  Place serving bowls on a baking sheet for easier handling.  Bake in oven 6-8 minutes until cheese is melted and starting to brown.  Serve piping hot with additional bread for dipping if desired.


It looks like a lot of onions at the start, but they do shrink down considerably as they cook.  Stir occasionally at the beginning using care not to break up the rings.

When the caramelization process is nearly complete you will need to stir more often so as not to scorch or fry your onion mixture. Watch carefully as you may need to reduce your heat.
Layer toasted baguette onto the soup.  Top with cheese.  Note the baking dish does make it easier to get in or out of the oven without spilling.  It also will catch and bubble ups and dribbles so you don't trash out your oven floor.

All melted and edges starting to brown, perfect soup for a cool fall day's dinner.  Beef broth is best, for a Meatless Monday option use a mushroom rich vegetable stock.

Wednesday, October 2, 2013

Gawd I love my copper...100 reason to do so

So I lied...not really 100 reasons
But I can tell you with a good degree of certainty I have a few HUGE reasons for copper over anything else, especially when its stainless steel lined versus old school tin lined.  Why does the lining matter, well copper is toxic and will leach and etch quickly when exposed to acids.  The lining cures that problem.

Coppers big advantage over anything else out there is that it is an excellent heat conductor and less prone to hot spots which cause scorching problems.  This heat conductivity is better than even a commercial grade aluminum...which I have a ton of as its so much more affordable.  More on the shopping later.

Old School tin lined has one big drawback to it.  Its only temporary and you do need to get it retinned every so often and that isn't too cheap.  Not something you want to do especially if its a frequently used pan.  Another drawback is that the tinned variety isn't always that thick so you do develop hot spots.  Copper as in any other pot or pan the thicker it is the better it will be at even heating and avoiding hot spots.

I really like the stainless steel lined pots and pans much better.  Its a more durable interior.  Its an easier to clean interior and it won't be harmed by the odd use of a SoS pad..  By its nature its a thicker pan so it going to have better resistance to hot spots than even the tin lined.  Another plus with the stainless steel lined is that it has better heat retention capabilities than the tin lined, something to consider when you are frying and need a constant stable high heat.

Keeping the exterior clean isn't that hard.  Twinkle copper cleaner that my Mom used on her copper bottomed Revere ware when I was a kid is cheap and effective.  Surfas in Culver City stocks a copper cleaner that costs more but is in a larger quantity that is as easy to use.  An old home cleaning trick is to make cut a lemon in half, dip the cut edge in salt and scrub away to bring back the shine! (I don't recommend as its a waste of a perfectly good lemon and is labor intensive).

Cooking with copper, especially the stainless steel line is a breeze.  It heats fast and evenly. Perfect for candy making, caramels and syrups that are so easy to scorch, but not with copper.  The steel lined interior doesn't pick up funky metallic tastes when you deglaze with acids like wine, vinegar or citrus juices can.

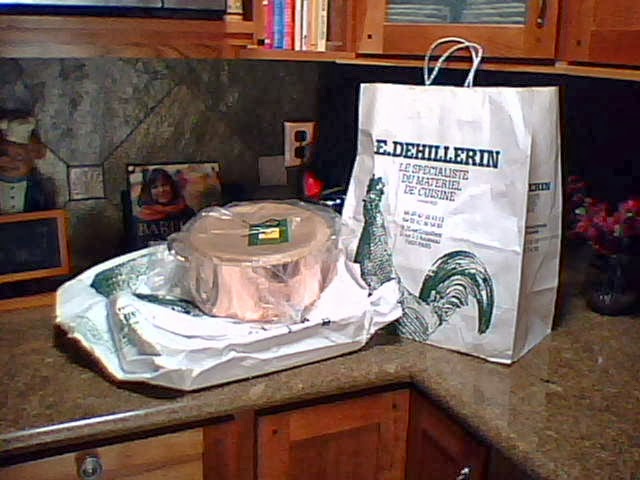
Buying copper, I've found some incredible deals out there.  I picked up mine in bits in pieces from a variety of places.  Check out Marshalls, TJ Maxx and Tuesday Morning for close outs.  I even scored on some really nice speciality pieces at E. Dehillerin in Paris, yes I was there as Ina Garten and Paula Deen both featured the place on their shows and I wasn't disappointed.  Charming staff, and even with the dreadful exchange rate, I saved nearly 40% over Williams Sonoma for better quality pans.

If you want a full set, one that is totally on my wish list, not a hodge podge of pieces you need to take a close look at the Calphalon Copper, best price I've found for a nice set is $399 at Bed Bath &Beyond.  Seriously, I'd donate my hodge podge for that set so if anyone feels generous hmu for a mailing address.  I started my copper collection about 7 years ago, which was about 6 years before the Calphalon set hit the market.  Its really good stuff, copper exterior, aluminum core and a stainless steel interior.  Hits all the marks to be a great set of cookware.  Until them I'll just love what I have.

Copper, its what great cooks are using.  Everywhere.

Monday, September 30, 2013

Stuffed Rigatoni...a labor of love and a half

Its all about the gravy...or red sauce as the Italians back east call it.   What ever you call it Rigatoni gets its name from the ridges on the big noodle.  They come in the all sizes, the smallest are nearly impossible to stuff, so get the big ones, the ones just about the size of a mans thumb before they are cooked is perfect.

I blogged a few years back a recipe for Italian style braised short ribs where the braising liquid is the perfect sauce or "gravy" to use on stuffed rigatoni.  Then I never gave you the recipe for the stuffed rigatoni that you could use.  Talk about a tease!

The original recipe was handwritten with no quantities.  We were living in the UP of Michigan when my Mom got the recipe from a fobby Italian lady who had served it at a pot luck.  They are really marvy, but in order to duplicate one does need to work from a recipe.  The original was combine ground beef and ground pork, brown.  Add Milk and Parmesan and stuff cooked rigatoni noodles.  Layer with short rib gravy and bake until hot.  Could it be anymore vague?  Fortunately I had watched my Mom make enough growing up I was able to guesstimate and wrote down actual quantities until I got it right.  

The one thing that isn't talked about is seasoning and salt in that original recipe from my childhood.  You do use salt and pepper.  On the former you do need to be a little light at the start as the Parmesan will add a lot salt on its own.  Better to start light and taste at the end and add more if needed as  once in you can't take it away.

Stuffing those things is a real bugger, I've tried everything, and it comes down to take your time and allot a good 30 minutes to stuffing the rigatoni.  This makes a full casserole and there just isn't an easy fast way to stuff the little buggers.  The secret to stuffing is twofold.  Large noodles to start is a must, sauce cool enough and sticky enough is the second part that you gotta have right.  Too cool and its crumbly and hard to get to stay in the noodle, too hot and you are burning your fingers.  The easiest way is to take the noodle and open it up with the bottom plugged with an in-turned finger.  Spoon in the filling and tap lightly to pack, but not so firm as to bust out the side.

The filling itself is creamy and mild tasting. The flavor it gets is from how intense your gravy or red sauce is.  I have used the braise from the Italian short ribs or tossed together a quick red sauce with some chili flake added to liven it up.  Regardless, this little step is where the flavor comes from so use a good sauce.


Stuffed Rigatoni

  • 2-3 c "gravy" or your favorite red sauce
  • 1 lb ground beef
  • 1 lb ground pork
  • 1/2 t salt
  • 1/2 t ground black pepper
  • 1 c  whole milk
  • 1 c shredded Parmesan
  • 2 lb rigatoni noodles


Cook rigatoni noodles according to package directions in well salted water.  I use about 1 T salt per gallon of water.  Drain noodles and dunk in ice water to cool them to handle. Drain well in colander.

Brown ground beef and ground pork in a heavy skillet, season with salt and pepper.  Break up and stir often over medium-high heat so you have small pieces that are well browned.  Reduce heat when browned and add milk, simmer and reduce liquid to half.  Add Parmesan cheese and stir until melted and creamy.  Test for salt and add more if needed.  Cover and cool until just warm to the touch.

Take a noodle and with a spoon insert enough filling to just fill the noodle.  Add a scant 1/4 cup of sauce to bottom of a greased casserole dish.  Stuff enough noodles to make one layer in the dish.  Spoon some sauce of the noodles.  Make additional layers of noodles with sauce spooned over until casserole dish is full. Bake in 350F oven until hot.
 (Any remaining stuffing mixture can be frozen or refrigerated and used for spaghetti another night).